OpenMRS:User Guide: Forskjell mellom sideversjoner
Markerte denne versjonen for oversettelse |
|||
| (31 mellomliggende versjoner av en annen bruker er ikke vist) | |||
| Linje 1: | Linje 1: | ||
<languages/> | <languages/> | ||
<translate> | <translate> | ||
<!--T:95--> | |||
[[OpenMRS:Start/en|Back to Start page]] | |||
== Log in to OpenMRS == <!--T:44--> | == Log in to OpenMRS == <!--T:44--> | ||
==== 1. Log in: ==== <!--T:45--> | ==== 1. Log in: ==== <!--T:45--> | ||
<!--T:97--> | |||
[[OpenMRS:Start/en|Back to Start page]] | |||
<!--T:46--> | <!--T:46--> | ||
| Linje 15: | Linje 20: | ||
<translate> | <translate> | ||
=== '''2. Select department''' === <!--T:49--> | === '''2. Select location (department)''' === <!--T:49--> | ||
<!--T:98--> | |||
[[OpenMRS:Start/en|Back to Start page]] | |||
===== 2.1 We use «Outpatient Clinic» (Poliklinikk) in the demo ===== <!--T:50--> | ===== 2.1 We use «Outpatient Clinic» (Poliklinikk) in the demo ===== <!--T:50--> | ||
| Linje 24: | Linje 32: | ||
[[File:Screenshot_20250311_205627.png|none|thumbnail|<translate><!--T:52--> 294x294pk</translate>]] | [[File:Screenshot_20250311_205627.png|none|thumbnail|<translate><!--T:52--> 294x294pk</translate>]] | ||
<translate> | <translate> | ||
=== 3. Register Ebola vaccine on patient === <!--T:53--> | |||
<!--T:99--> | |||
[[OpenMRS:Start/en|Back to Start page]] | |||
<!--T:76--> | <!--T:76--> | ||
==== 3.1 Add new patient by clicking on figure with + symbol ==== | ==== 3.1 Add new patient by clicking on figure with + symbol ==== | ||
Note: If the patient is already in the system, go [[OpenMRS#3.7 Find an existing patient by searching|3.7 Find an existing patient by searching]], else continue here: | Note: If the patient is already in the system, go [[OpenMRS#3.7 Find an existing patient by searching|3.7 Find an existing patient by searching]], else continue here: | ||
[[Fil:Add-Patient-1.png|ingen|miniatyr| | [[Fil:Add-Patient-1.png|ingen|miniatyr|535x535pk]] | ||
<!--T:77--> | <!--T:77--> | ||
| Linje 55: | Linje 65: | ||
</translate> | </translate> | ||
<translate> | |||
<!--T:83--> | |||
Continue to [[OpenMRS#3.9 Start a visit to register Ebola vaccine on patient|3.9 Start a visit to register Ebola vaccine on patient]] | Continue to [[OpenMRS#3.9 Start a visit to register Ebola vaccine on patient|3.9 Start a visit to register Ebola vaccine on patient]] | ||
===== 3.7 Find an existing patient by searching ===== | ===== 3.7 Find an existing patient by searching ===== <!--T:84--> | ||
<!--T:85--> | |||
Press the magnification symbol in the top right and the search interface appears | Press the magnification symbol in the top right and the search interface appears | ||
[[Fil:Add-Patient-1.png|ingen|miniatyr|535x535px]] | [[Fil:Add-Patient-1.png|ingen|miniatyr|535x535px]] | ||
| Linje 65: | Linje 78: | ||
As you type you will get suggestions, so you don't necessary need to type the entire name as seen. | As you type you will get suggestions, so you don't necessary need to type the entire name as seen. | ||
<!--T:86--> | |||
Click the patient to open the patient interface | Click the patient to open the patient interface | ||
[[Fil:Search-and-find-patient.png|ingen|miniatyr|535x535px]] | [[Fil:Search-and-find-patient.png|ingen|miniatyr|535x535px]] | ||
<!--T:87--> | |||
==== 3.9 Start a visit to register Ebola vaccine on patient ==== | ==== 3.9 Start a visit to register Ebola vaccine on patient ==== | ||
[[Fil:Start-a-visist-1.png|ingen|miniatyr|535x535px]] | [[Fil:Start-a-visist-1.png|ingen|miniatyr|535x535px]] | ||
<!--T:88--> | |||
===== 3.10 Select «Facility Visit» in the right list and then press «Start visit» ===== | ===== 3.10 Select «Facility Visit» in the right list and then press «Start visit» ===== | ||
[[Fil:Start-visit-2.png|ingen|miniatyr|535x535px]] | [[Fil:Start-visit-2.png|ingen|miniatyr|535x535px]] | ||
<!--T:89--> | |||
==== 3.11 Select «Immunizations» from the left menu ==== | ==== 3.11 Select «Immunizations» from the left menu ==== | ||
Note: If you don't see the left menu, press the "Hamburger" meny in the top left corner | Note: If you don't see the left menu, press the "Hamburger" meny in the top left corner | ||
[[Fil:Register-Immunization-1.png|ingen|miniatyr|535x535px]] | [[Fil:Register-Immunization-1.png|ingen|miniatyr|535x535px]] | ||
===== 3.12 Press «Record Immunizations» ===== | ===== 3.12 Press «Record Immunizations» ===== <!--T:90--> | ||
<!--T:91--> | |||
To select the Ebola vaccine Ervebo, press Immunization in the list on the right and scroll down and select Ebola vaccine Ervebo. | To select the Ebola vaccine Ervebo, press Immunization in the list on the right and scroll down and select Ebola vaccine Ervebo. | ||
[[Fil:Register-Immunization-2.png|ingen|miniatyr|535x535px]] | [[Fil:Register-Immunization-2.png|ingen|miniatyr|535x535px]] | ||
<!--T:92--> | |||
==== 3.13 Select Ebola vaccine, Ervebo from the Immunization list ==== | ==== 3.13 Select Ebola vaccine, Ervebo from the Immunization list ==== | ||
[[Fil:Select-ebola-immunizations-from-list.png|ingen|miniatyr|535x535px]] | [[Fil:Select-ebola-immunizations-from-list.png|ingen|miniatyr|535x535px]] | ||
| Linje 89: | Linje 108: | ||
You will now see a list of the Recent vaccinations and you will see the Ebola vaccine in the list | You will now see a list of the Recent vaccinations and you will see the Ebola vaccine in the list | ||
<!--T:93--> | |||
You can now End the visit | You can now End the visit | ||
[[Fil:Register-ebola-Immunizations-end-visit.png|ingen|miniatyr|535x535px]] | [[Fil:Register-ebola-Immunizations-end-visit.png|ingen|miniatyr|535x535px]] | ||
Confirm end visit | Confirm end visit | ||
[[Fil:Register-Immunizations-confirm-end-visit.png|ingen|miniatyr|535x535px]] | [[Fil:Register-Immunizations-confirm-end-visit.png|ingen|miniatyr|535x535px]] | ||
Press X in top right | Press X in top right menu to exit patient | ||
[[Fil:Register-Immunization-exit-patient-panel.png|ingen|miniatyr|535x535px]] | [[Fil:Register-Immunization-exit-patient-panel.png|ingen|miniatyr|535x535px]] | ||
===== 3.15 Congratulations you did it! ===== | ===== 3.15 Congratulations you did it! ===== <!--T:94--> | ||
</translate> | |||
<translate> | |||
<!--T:96--> | |||
[[OpenMRS:Start/en|Back to start page]] | |||
</translate> | |||
<translate> | |||
<!--T:115--> | |||
=== 4. Register vitals on patient === | |||
Note: If patient doesn't exist, see 3.1 to 3.6 on how to [[OpenMRS:User Guide#3.1 Add new patient by clicking on figure with + symbol|register new patient]] | |||
==== 4.1 Start a new visit ==== <!--T:116--> | |||
<!--T:117--> | |||
===== 4.1.1 Find the patient to record vitals and Start a visit ===== | |||
[[Fil:Start-new-visit-record-vitals-1.png|ingen|miniatyr|535x535pk]] | |||
<!--T:118--> | |||
===== '''4.1.2 Chose Visit Type, example Facility Visit and click Start visit''' ===== | |||
[[Fil:Start-visit-2.png|ingen|miniatyr|535x535pk]] | |||
<!--T:119--> | |||
===== 4.1.3 Recording patient vitals and biometric ===== | |||
You can record 1. vital signs, 2. biometrics, 3. active medications and 4. conditions | |||
[[Fil:Record-facts-on-patient-1.png|ingen|miniatyr|535x535pk]] | |||
[[Fil:Record-other-conditions-orders-reults-1.png|ingen|miniatyr|535x535pk]] | |||
To record other facts such as Immunizations, Allergies, orders, see results click the "hamburger menu" in top left corner and pick from the list on the left | |||
<!--T:120--> | |||
==== 4.2 Record vital signs ==== | |||
Fill in the values in the list on the right side | |||
[[Fil:Record-vitals-biometrics-1.png|ingen|miniatyr|535x535pk]] | |||
When vitals are filled in click Save and close | |||
<!--T:121--> | |||
Note: The color changes to pink If a value is outside normal range | |||
[[Fil:Record-vitals-biometrics-save-and-close-3.png|ingen|miniatyr|535x535pk]] | |||
<!--T:122--> | |||
==== 4.3 Patient facts is updated ==== | |||
We can now see updated records on the patient under Vitals and Biometrics | |||
[[Fil:Record-vitals-done-1.png|ingen|miniatyr|535x535pk]] | |||
<!--T:123--> | |||
==== 4.4 End visit ==== | |||
If the visit is over you can click the geen End visit button in top right corner to end the visit | |||
[[Fil:End-visit-1.png|ingen|miniatyr|535x535pk]] | |||
[[OpenMRS:Start/en|Back to Start page]] | |||
=== 5. Register new department === <!--T:100--> | |||
<!--T:101--> | |||
==== 5.1 - Log in to the administration panel for locations ==== | |||
Go to: http://malinux.no:8080/openmrs/ | |||
<!--T:102--> | |||
Contact system administrator for username and password | |||
<!--T:103--> | |||
Click on Administration | |||
[[Fil:Add-new-department-4.1.png|ingen|miniatyr|535x535pk]] | |||
<!--T:104--> | |||
==== 5.2 - Manage locations ==== | |||
Click on Manage Locations | |||
[[Fil:Add-new-department-4.2.png|ingen|miniatyr|535x535pk]] | |||
<!--T:105--> | |||
==== 5.3 - Add locations ==== | |||
[[Fil:Add-new-department-4.3.png|ingen|miniatyr|533x533pk]] | |||
<!--T:106--> | |||
==== 5.4 - Enter the name of the department ==== | |||
Add a name in the Name field | |||
<!--T:107--> | |||
Add a description in the Description field | |||
<!--T:108--> | |||
Check the Login Location box so that the department can be selected from the login screen. | |||
<!--T:109--> | |||
Finally, press Save Location. | |||
[[Fil:Add-new-department-4.4.png|ingen|miniatyr|535x535pk]] | |||
<!--T:110--> | |||
==== 5.5 - The department "Emergency Room" is registred ==== | |||
The department named "Emergency Room" is now in the list of available departments | |||
[[Fil:Add-new-department-4.5.png|ingen|miniatyr|535x535pk]] | |||
<!--T:111--> | |||
==== 5.6 - Log in to the new department ==== | |||
Go to http://malinux.no:8080/openmrs/spa and select Emergency Room from the list. | |||
<!--T:112--> | |||
In this example, it is at the bottom of the list. | |||
<!--T:113--> | |||
Then press Confirm. | |||
[[Fil:Add-new-department-4.6.png|ingen|miniatyr]] | |||
You are now logged into the new department "Emergency Room" | |||
<!--T:114--> | |||
[[OpenMRS:Start/en|Back to start page]] | |||
</translate> | |||
Sideversjonen fra 7. apr. 2025 kl. 17:18
Log in to OpenMRS
1. Log in:
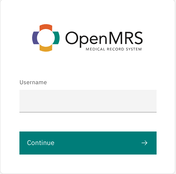
1.1 Go to: http://malinux.no:8080/openmrs/spa/
Log in with your username and password. If you do not have this, contact systemadministrator to get this.
2. Select location (department)
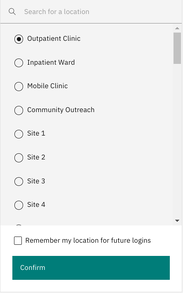
2.1 We use «Outpatient Clinic» (Poliklinikk) in the demo
Press «Confirm» to continue.
3. Register Ebola vaccine on patient
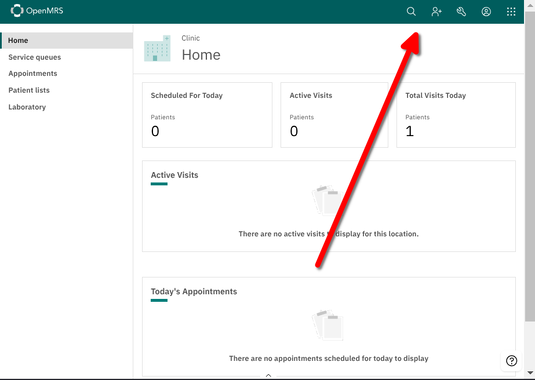
3.1 Add new patient by clicking on figure with + symbol
Note: If the patient is already in the system, go 3.7 Find an existing patient by searching, else continue here:
3.2 Fill in Name, Familiy Name, Sex and Birth
Minimum needed the First Name, Family Name, Sex, and Birth fields must be completed:
In the Sex field, select: Male or Female.
Select Other or Uknown for the medical condition: Q56.4 (ICD-10) Indeterminate sex and LD2A.Z (ICD-11) (Disorders of sex development, unspecified);
Select "Date of Birth"
If date of birth is unknown, press No and enter an estimated age in years or months.
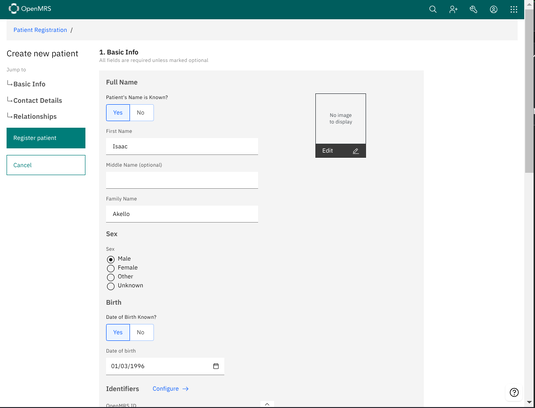
Scroll down the page to fill in info such as "Address" and "Relationships" (Not mandatory).
3.6 Register patient by clicking green button
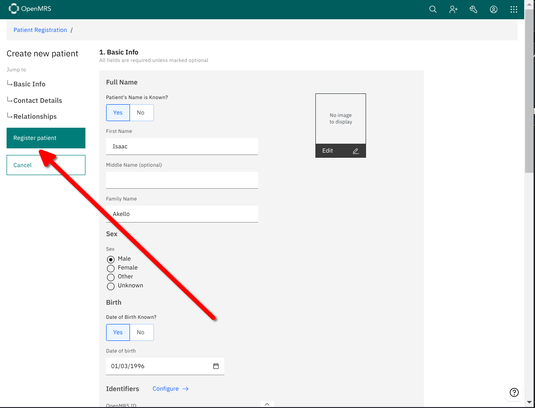
Continue to 3.9 Start a visit to register Ebola vaccine on patient
3.7 Find an existing patient by searching
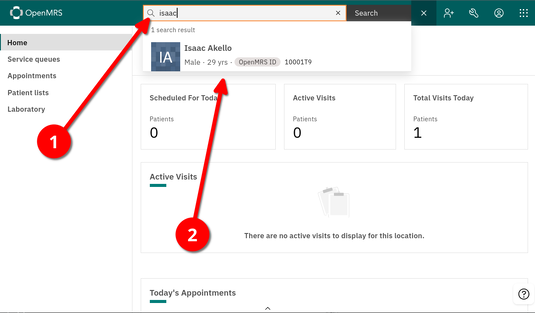
Press the magnification symbol in the top right and the search interface appears

3.8 Search for the test patient Isaac Akello
As you type you will get suggestions, so you don't necessary need to type the entire name as seen.
Click the patient to open the patient interface
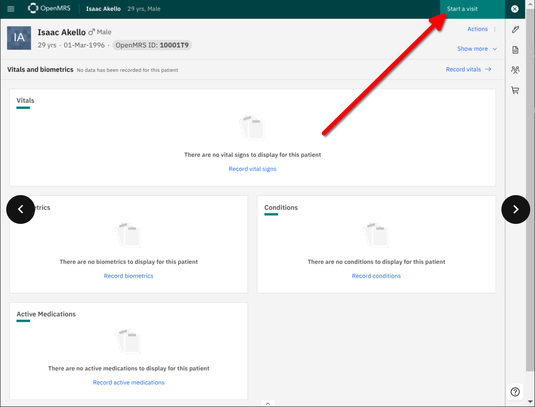
3.9 Start a visit to register Ebola vaccine on patient
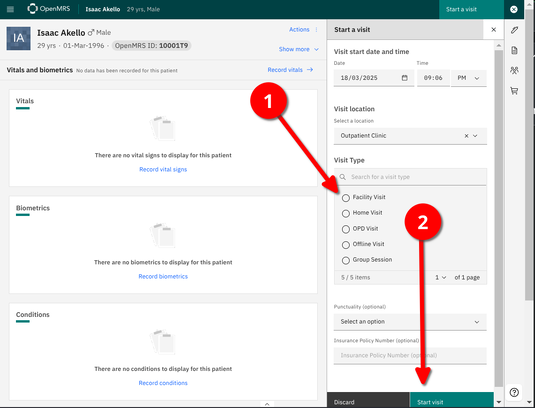
3.10 Select «Facility Visit» in the right list and then press «Start visit»
Note: If you don't see the left menu, press the "Hamburger" meny in the top left corner
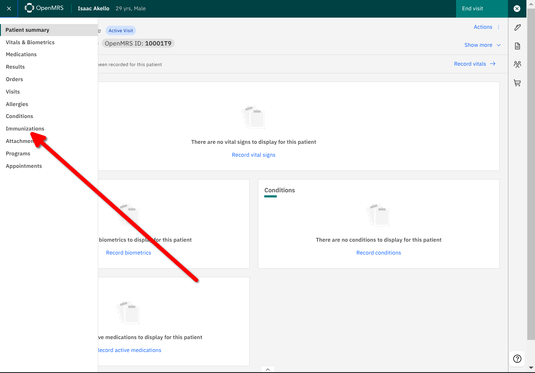
3.12 Press «Record Immunizations»
To select the Ebola vaccine Ervebo, press Immunization in the list on the right and scroll down and select Ebola vaccine Ervebo.
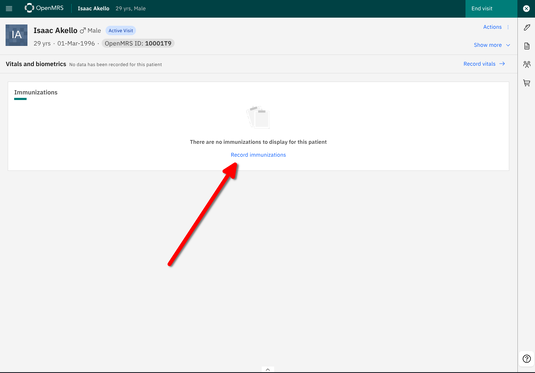
3.13 Select Ebola vaccine, Ervebo from the Immunization list
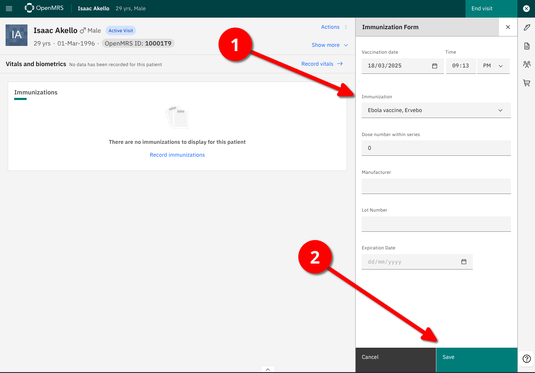
Press «Save».
3.14 End visit
You will now see a list of the Recent vaccinations and you will see the Ebola vaccine in the list
You can now End the visit
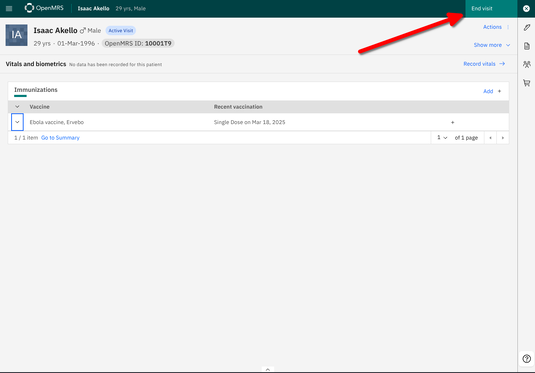
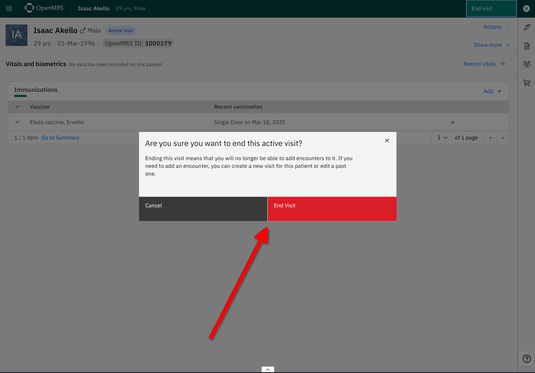
Confirm end visit
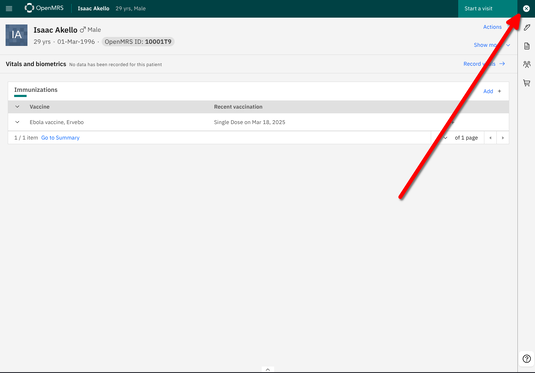
Press X in top right menu to exit patient
3.15 Congratulations you did it!
4. Register vitals on patient
Note: If patient doesn't exist, see 3.1 to 3.6 on how to register new patient
4.1 Start a new visit
4.1.1 Find the patient to record vitals and Start a visit
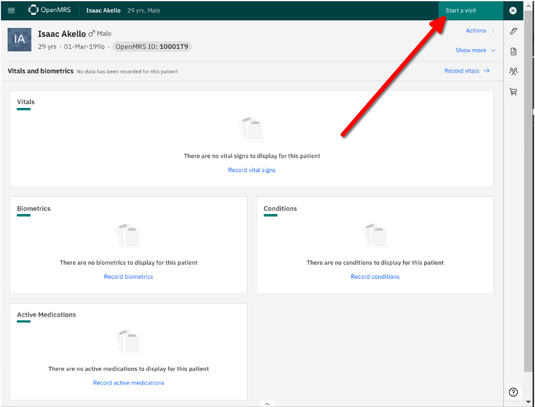
4.1.2 Chose Visit Type, example Facility Visit and click Start visit

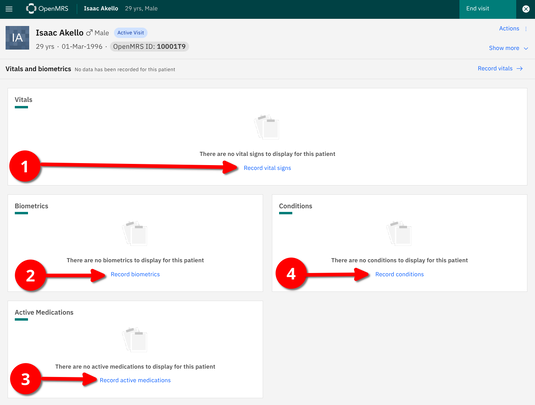
4.1.3 Recording patient vitals and biometric
You can record 1. vital signs, 2. biometrics, 3. active medications and 4. conditions
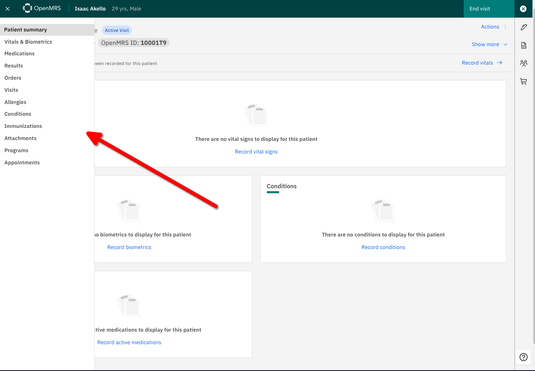
To record other facts such as Immunizations, Allergies, orders, see results click the "hamburger menu" in top left corner and pick from the list on the left
4.2 Record vital signs
Fill in the values in the list on the right side
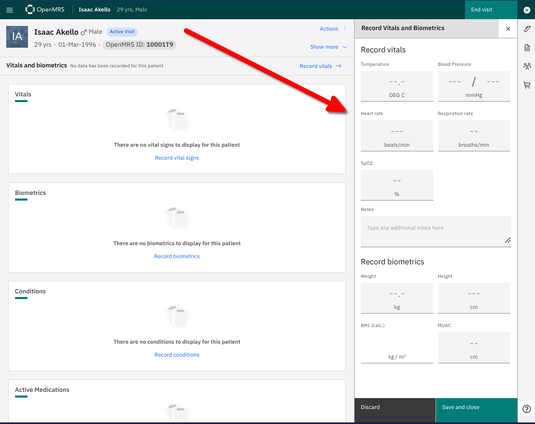
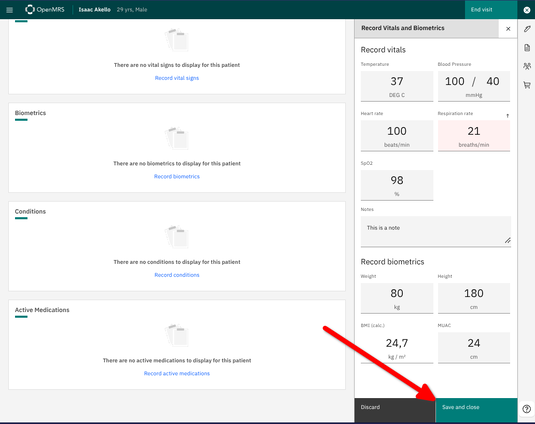
When vitals are filled in click Save and close
Note: The color changes to pink If a value is outside normal range
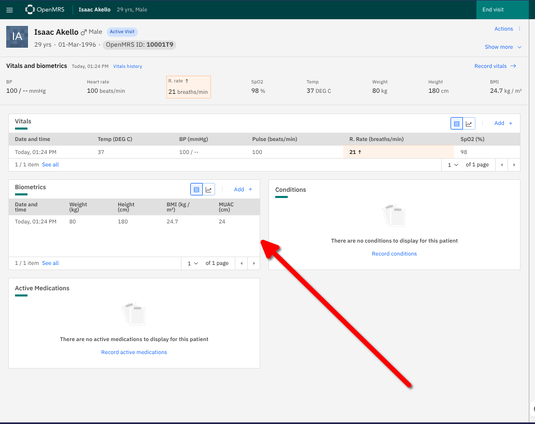
4.3 Patient facts is updated
We can now see updated records on the patient under Vitals and Biometrics
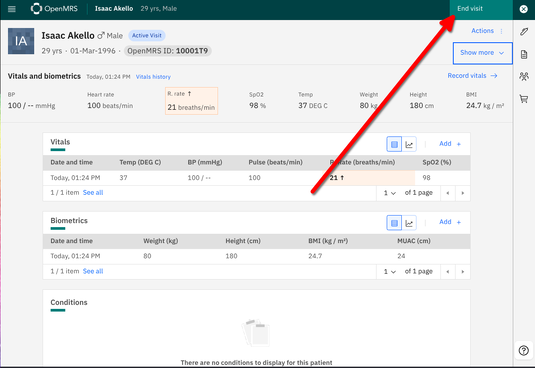
4.4 End visit
If the visit is over you can click the geen End visit button in top right corner to end the visit
5. Register new department
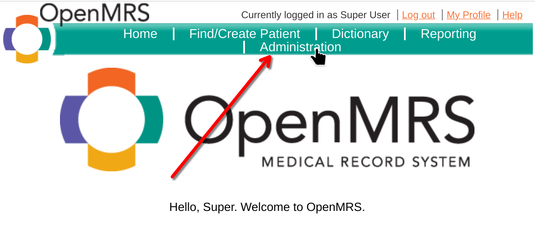
5.1 - Log in to the administration panel for locations
Go to: http://malinux.no:8080/openmrs/
Contact system administrator for username and password
Click on Administration
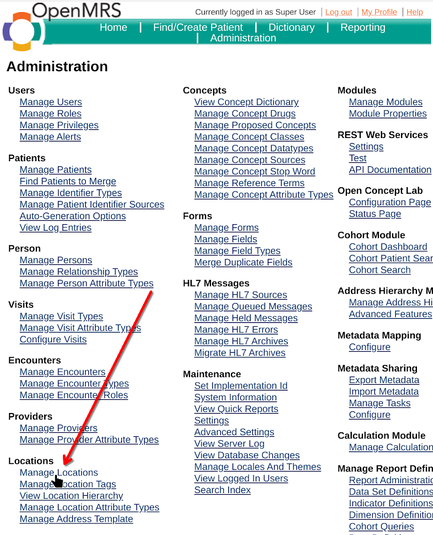
5.2 - Manage locations
Click on Manage Locations
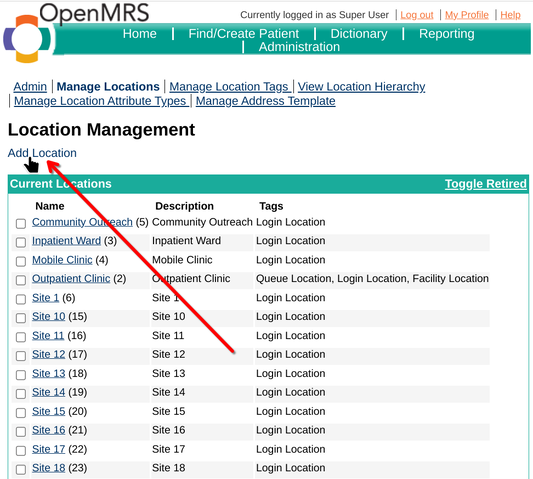
5.3 - Add locations
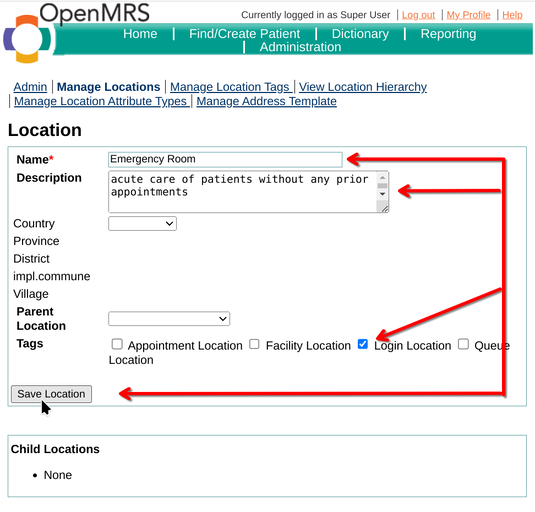
5.4 - Enter the name of the department
Add a name in the Name field
Add a description in the Description field
Check the Login Location box so that the department can be selected from the login screen.
Finally, press Save Location.
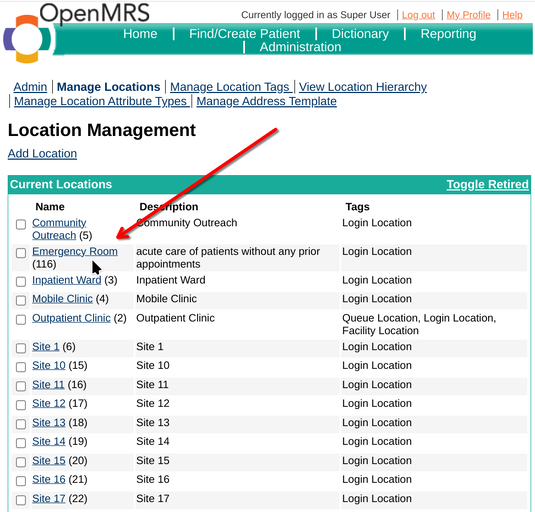
5.5 - The department "Emergency Room" is registred
The department named "Emergency Room" is now in the list of available departments
5.6 - Log in to the new department
Go to http://malinux.no:8080/openmrs/spa and select Emergency Room from the list.
In this example, it is at the bottom of the list.
Then press Confirm.
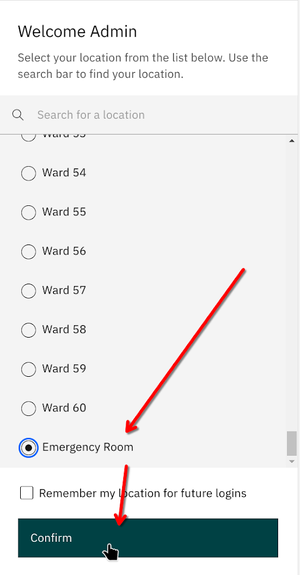
You are now logged into the new department "Emergency Room"