OpenMRS:User Guide/nb: Forskjell mellom sideversjoner
Ny side: Tilbake til startsiden |
Oppdaterer for å svare til ny versjon av kildesiden |
||
| Linje 96: | Linje 96: | ||
===== 3.15 Gratulerer du klarte det! ===== | ===== 3.15 Gratulerer du klarte det! ===== | ||
[[OpenMRS:Start|Tilbake til startsiden]] | [[OpenMRS:Start|Tilbake til startsiden]] | ||
<div lang="en" dir="ltr" class="mw-content-ltr"> | |||
==== 4 Register new department ==== | ==== 4 Register new department ==== | ||
</div> | |||
<div lang="en" dir="ltr" class="mw-content-ltr"> | |||
===== 4.1 - Log in to the administration panel for locations ===== | ===== 4.1 - Log in to the administration panel for locations ===== | ||
Go to: http://malinux.no:8080/openmrs/ | Go to: http://malinux.no:8080/openmrs/ | ||
</div> | |||
<div lang="en" dir="ltr" class="mw-content-ltr"> | |||
Contact system administrator for username and password | Contact system administrator for username and password | ||
</div> | |||
<div lang="en" dir="ltr" class="mw-content-ltr"> | |||
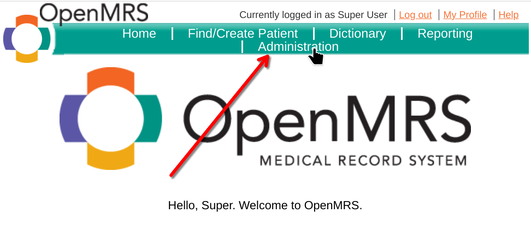
Click on Administration | Click on Administration | ||
[[Fil:Add-new-department-4.1.png|ingen|miniatyr|531x531pk]] | [[Fil:Add-new-department-4.1.png|ingen|miniatyr|531x531pk]] | ||
</div> | |||
<div lang="en" dir="ltr" class="mw-content-ltr"> | |||
==== 4.2 - Manage locations ==== | ==== 4.2 - Manage locations ==== | ||
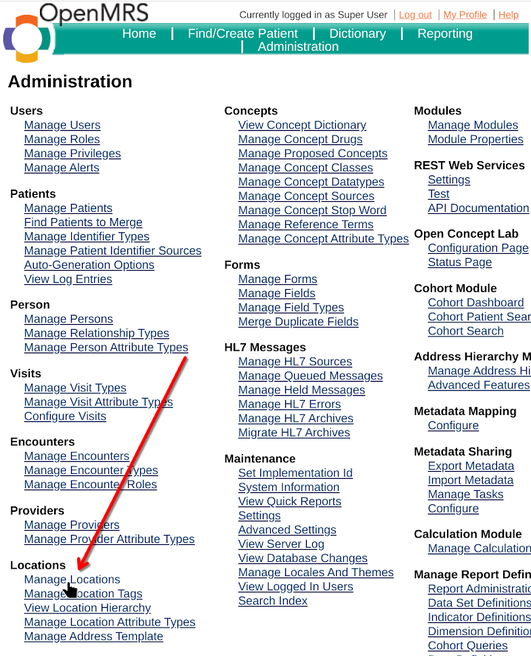
Click on Manage Locations | Click on Manage Locations | ||
[[Fil:Add-new-department-4.2.png|ingen|miniatyr|656x656pk]] | [[Fil:Add-new-department-4.2.png|ingen|miniatyr|656x656pk]] | ||
</div> | |||
<div lang="en" dir="ltr" class="mw-content-ltr"> | |||
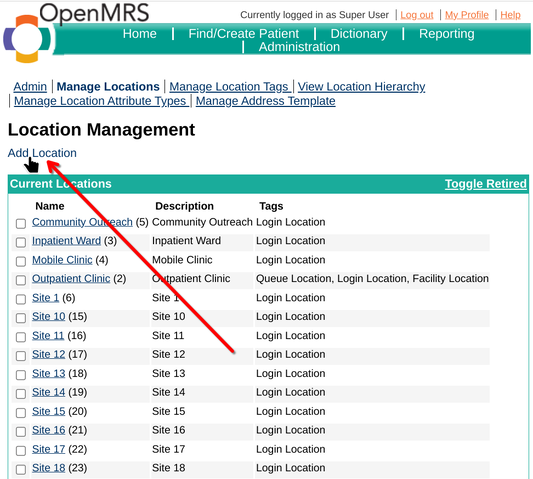
==== 4.3 - Add locations ==== | ==== 4.3 - Add locations ==== | ||
[[Fil:Add-new-department-4.3.png|ingen|miniatyr|533x533pk]] | [[Fil:Add-new-department-4.3.png|ingen|miniatyr|533x533pk]] | ||
</div> | |||
<div lang="en" dir="ltr" class="mw-content-ltr"> | |||
===== 4.4 - Enter the name of the department ===== | ===== 4.4 - Enter the name of the department ===== | ||
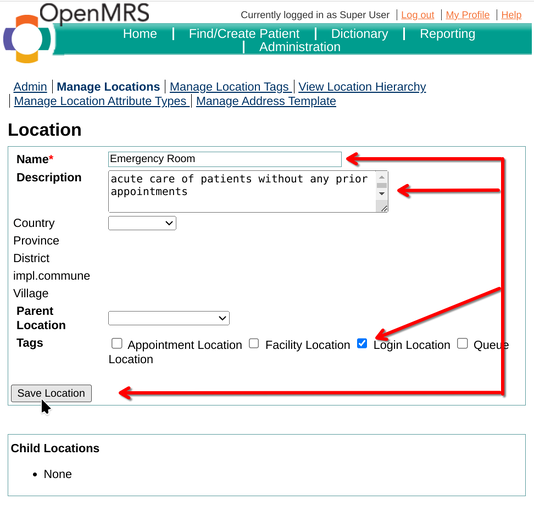
Add a name in the Name field | Add a name in the Name field | ||
</div> | |||
Add a description in the Description field | <div lang="en" dir="ltr" class="mw-content-ltr"> | ||
Add a description in the Description field | |||
</div> | |||
Check the Login Location box so that the department can be selected from the login screen. | <div lang="en" dir="ltr" class="mw-content-ltr"> | ||
Check the Login Location box so that the department can be selected from the login screen. | |||
</div> | |||
<div lang="en" dir="ltr" class="mw-content-ltr"> | |||
Finally, press Save Location. | Finally, press Save Location. | ||
[[Fil:Add-new-department-4.4.png|ingen|miniatyr|534x534pk]] | [[Fil:Add-new-department-4.4.png|ingen|miniatyr|534x534pk]] | ||
</div> | |||
<div lang="en" dir="ltr" class="mw-content-ltr"> | |||
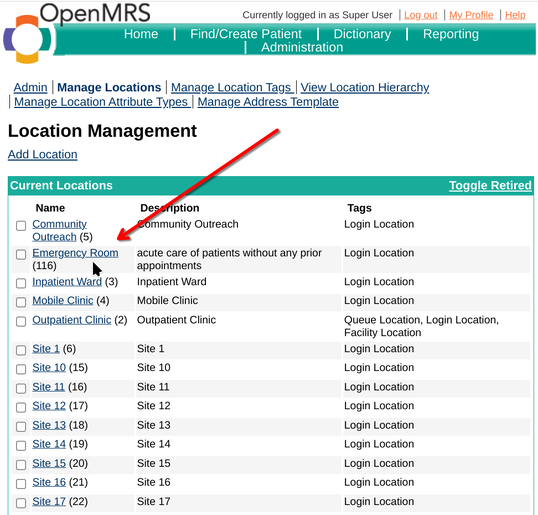
===== 4.5 - The department "Emergency Room" is registred ===== | ===== 4.5 - The department "Emergency Room" is registred ===== | ||
The department named "Emergency Room" is now in the list of available departments | The department named "Emergency Room" is now in the list of available departments | ||
[[Fil:Add-new-department-4.5.png|ingen|miniatyr|538x538pk]] | [[Fil:Add-new-department-4.5.png|ingen|miniatyr|538x538pk]] | ||
</div> | |||
<div lang="en" dir="ltr" class="mw-content-ltr"> | |||
===== 4.6 - Log in to the new department ===== | ===== 4.6 - Log in to the new department ===== | ||
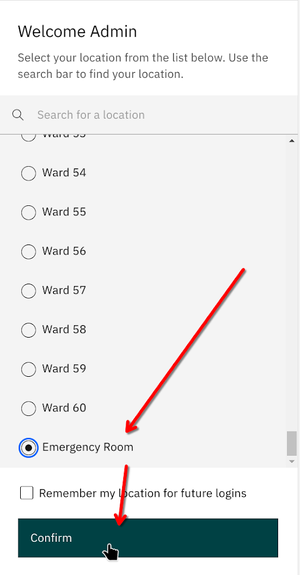
Go to http://malinux.no:8080/openmrs/spa and select Emergency Room from the list. | Go to http://malinux.no:8080/openmrs/spa and select Emergency Room from the list. | ||
</div> | |||
In this example, it is at the bottom of the list. | <div lang="en" dir="ltr" class="mw-content-ltr"> | ||
In this example, it is at the bottom of the list. | |||
</div> | |||
<div lang="en" dir="ltr" class="mw-content-ltr"> | |||
Then press Confirm. | Then press Confirm. | ||
[[Fil:Add-new-department-4.6.png|ingen|miniatyr]] | [[Fil:Add-new-department-4.6.png|ingen|miniatyr]] | ||
You are now logged into the new department "Emergency Room" | You are now logged into the new department "Emergency Room" | ||
</div> | |||
<div lang="en" dir="ltr" class="mw-content-ltr"> | |||
[[OpenMRS:Start/en|Back to start page]] | [[OpenMRS:Start/en|Back to start page]] | ||
</div> | |||
Sideversjonen fra 3. apr. 2025 kl. 11:29
Logg inn på OpenMRS
1. Logg inn:
1.1 Gå til: http://malinux.no:8080/openmrs/spa/
Logg inn med brukernavn og passord. Hvis du ikke har dette, kontakt systemadministrator for å få dette.
2. Velg avdeling
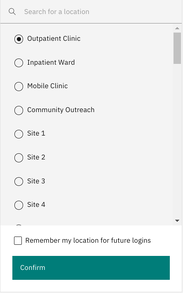
2.1 Vi bruker «poliklinikk» (Poliklinikk) i demoen
Trykk «Bekreft» for å fortsette.
3. Registrer ebola-vaksine på pasient
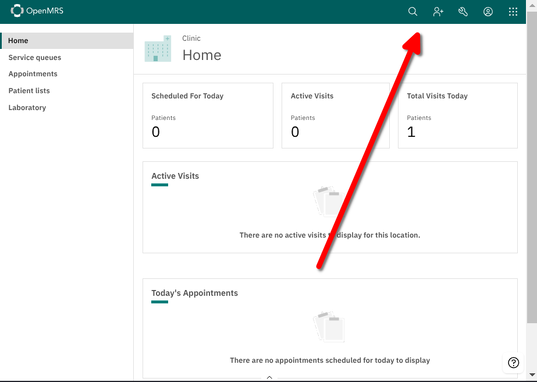
3.1 Legg til ny pasient ved å klikke på figuren med + symbol
Merk: Hvis pasienten allerede er i systemet, gå 3.7 Finn en eksisterende pasient ved å søke, ellers fortsett her:
Minimum nødvendig feltene Fornavn, Familienavn, Kjønn og Fødsel må fylles ut:
Velg Mann eller Kvinne.
Velg Annet eller Ukjent for den medisinske tilstanden: Q56.4 (ICD-10) Ubestemt kjønn og LD2A.Z (ICD-11) (Forstyrrelser i kjønnsutvikling, uspesifisert);
Velg "Fødselsdato"
Hvis fødselsdatoen er ukjent, trykker du på Nei og skriver inn en beregnet alder i år eller måneder.
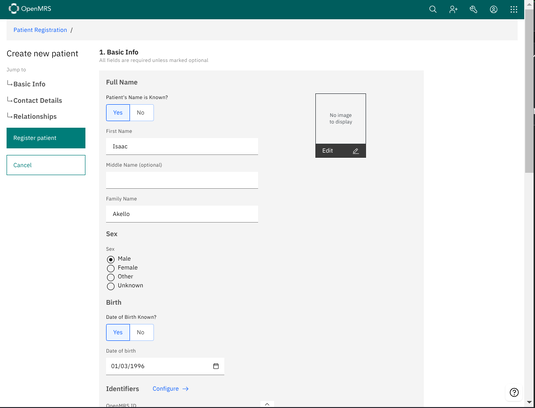
Rull ned på siden for å fylle ut info som "Adresse" og "Relasjoner" (ikke obligatorisk).
3.6 Registrer pasient ved å klikke på grønn knapp
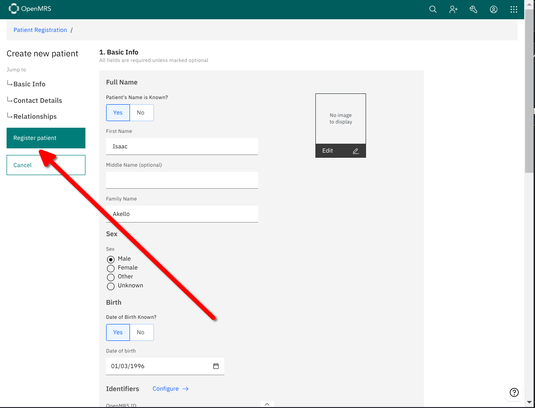
Fortsett til 3.9 Start et besøk for å registrere ebola-vaksine på pasient
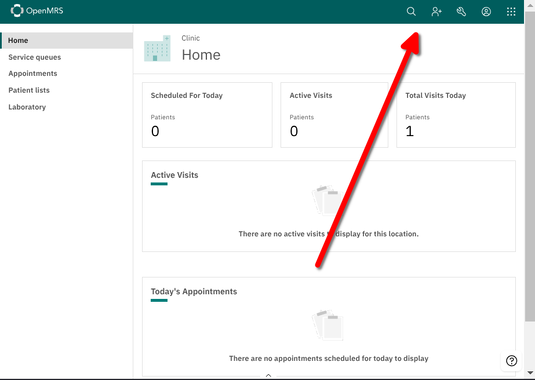
3.7 Finn en eksisterende pasient ved å søke
Trykk på forstørrelsessymbolet øverst til høyre og søkegrensesnittet vises
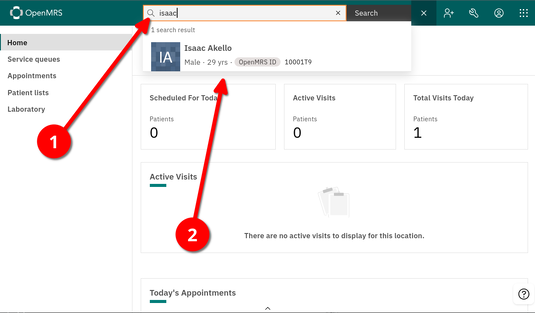
3.8 Søk etter testpasienten Isaac Akello
Mens du skriver vil du få forslag, så du trenger ikke å skrive inn hele navnet som vist.
Klikk på pasienten for å åpne pasientgrensesnittet
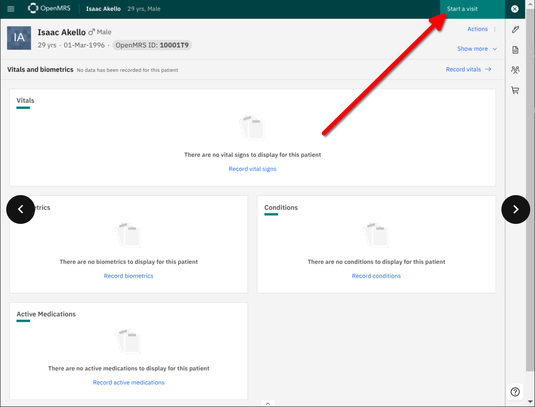
3.9 Start et besøk for å registrere ebola-vaksine på pasient
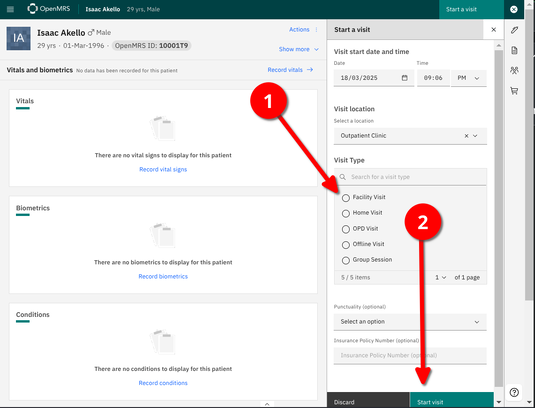
3.10 Velg «Facility Visit» i den høyre listen og trykk deretter «Start visit»
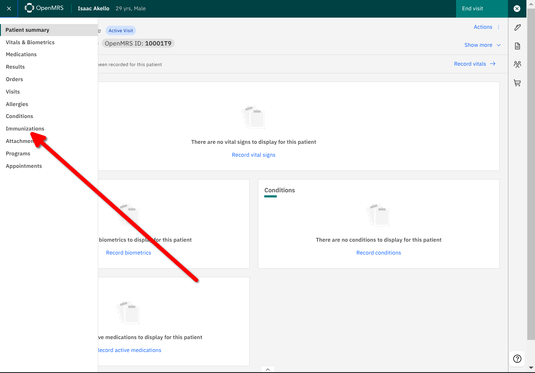
3.11 Velg «Immuniseringer» fra venstremenyen
Merk: Hvis du ikke ser venstremenyen, trykker du på "Hamburger"-menyen øverst i venstre hjørne
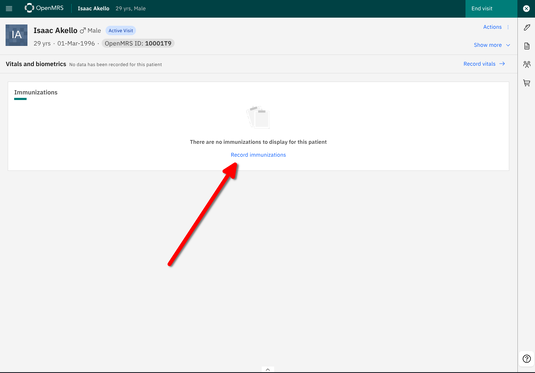
3.12 Trykk «Registrer vaksinasjoner»
For å velge Ebola-vaksinen Ervebo, trykk Immunisering i listen til høyre og bla ned og velg Ebola-vaksine Ervebo.
3.13 Velg Ebola-vaksine, Ervebo fra immuniseringslisten
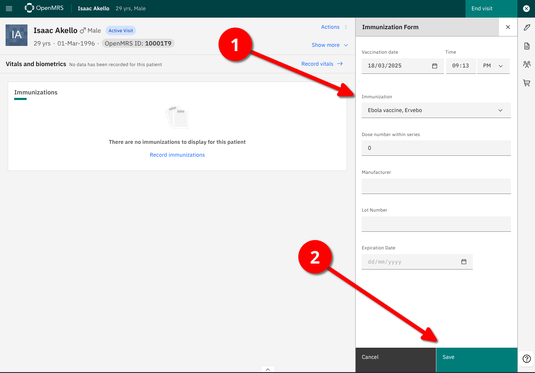
Trykk «Lagre».
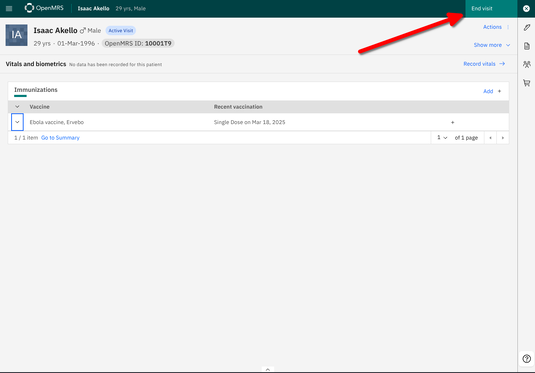
3.14 Avslutt besøk
Du vil nå se en liste over de siste vaksinene, og du vil se ebola-vaksinen i listen
Du kan nå avslutte besøket
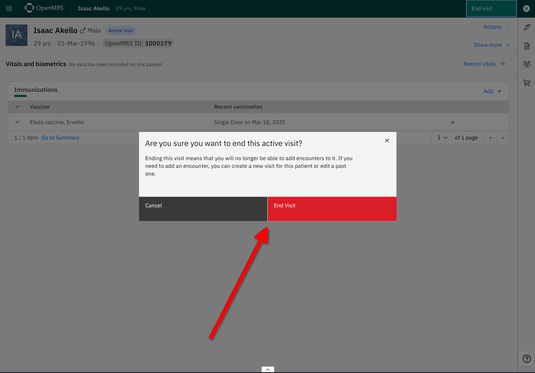
Bekreft sluttbesøk
Trykk X i menyen øverst til høyre for å gå ut av pasienten
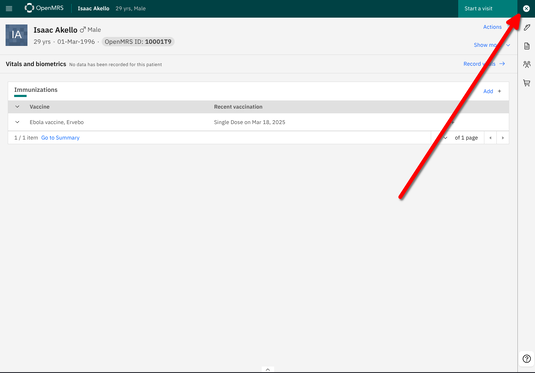
3.15 Gratulerer du klarte det!
4 Register new department
4.1 - Log in to the administration panel for locations
Contact system administrator for username and password
4.4 - Enter the name of the department
Add a name in the Name field
Add a description in the Description field
Check the Login Location box so that the department can be selected from the login screen.
4.5 - The department "Emergency Room" is registred
The department named "Emergency Room" is now in the list of available departments
4.6 - Log in to the new department
Go to http://malinux.no:8080/openmrs/spa and select Emergency Room from the list.
In this example, it is at the bottom of the list.
